Lectures & discussions
General note: this is a chapter with two essays on related topics: inking with a pen and making corrections on art.
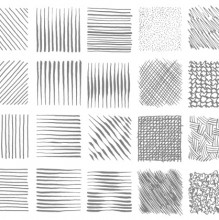
8.1 Inking with a nib pen
A demo of different kinds of nibs is the best supplement to this essay. You can have the students do a warm-up activity based on the practice line squares described on pp. 108-109. This will also give you an opportunity to walk around the room troubleshooting (see p. 110).
Bring in books, a slide show, or samples of your own work to show examples of different kinds of pens and techniques
8.2 Making corrections
A demo of the techniques in this section along with any other techniques you use will help get the idea across. Depending on the equipment you have available you could supplement this with a lesson on doing corrections on the computer, in which case you might want to skip ahead and cover the scanning demo in chapter 14 (p. 212).
To practice, have your students make (more) corrections on their “Comics with no pictures” from Chapter 7.
Activities
Ink your own drawings with a nib
It's a good idea to manage time pretty tightly on this activity. Make sure everyone knows how to transfer tracings of their drawings with graphite, or that they have access to a light table, and give them a time limit on finishing that stage, 20 minutes or so. When they start inking, circulate and make sure they are getting the hang of inking with nibs and do some troubleshooting as needed. Remind students to try different approaches on each copy. Suggest different techniques or point out other artists in the book or examples you have on hand. Reassure students that it's fine to make smudges and drips; that's what white is for.
Click to see examples of the activity by students with some comments from Matt and Jessica. Sidebar
Inking Tools
A word on posture
Be sure to point this sidebar out to students and discuss options for drawing set-ups in your classroom. This would be a good time to review how to adjust whatever kind of drafting tables you have or how to prop up drawing boards or even bristol board pads. Ask students what kind of set-ups they have at home and make sure they're not sitting on their beds hunched over their bristol board! Consider having students practice the exercises on p. 114. Yes, they will laugh at you and think you are a dork.
Making your Corrections Stick
Further reading
Arthur Guptill and Susan Meyer, Rendering in Pen and Ink: The Classic Book on Pen and Ink Techniques for Artists, Illustrators, Architects, and Designers
Klaus Janson, The DC Comics Guide to Inking Comics
Gary Martin, The Art Of Comic-Book Inking
Joseph A. Smith, The Pen & Ink Book: Materials and Techniques for Today’s Artist
"A month of Sundays" inking
Line for line
If you have time for it, having students make precise copies of a favorite drawing is a great way for them to learn about inking technique, image construction, and visual problem solving. Matt always tells them their goal is to make a perfect "forgery." If you do decide to do this activity, here or in Chapter 13, when we cover brush inking, it’s a good idea to select and photocopy a number of appropriate panels for students to choose from. Try to copy them at the size you think they were originally drawn. You may also want to bring tracing paper and be prepared to cover tracing (again) so that the class doesn’t get hung up on students who don’t have their materials.
Homework critique Chapter 8: "'A month of Sundays' inking"
Drawing with nibs can be very frustrating at first so be encouraging and let students know that they are not hopeless, that there is definitely a learning curve to drawing with nibs. In your crit, try to balance technical advice and aesthetic feedback. Click on the links below to see examples of student homework with comments from Matt and Jesscia